So last week, I took a French cooking class. One of the things we made was a French pesto called a pistou. Then Rosie and I went to the Williams and Sonoma where she found a cookbook called Tacos by the chef that owns the coyote cafe in Sante Fe. Let me tell you, if you see this cookbook you should definitely get it. At any rate, in the vegetarian taco chapter, there was a recipe for a Mexican pesto. I was intrigued. In general pesto is some herb and nuts pulverized with oil and cheese (although the French avoid both notes and cheese). So back to the Mexican pesto- I tweaked the reecipe. We spread it directly on corn tortillas then topped with roasted poblanos, roasted tomatoes, and grilled chicken. Honestly,this is some delicious shit.
1/2 a package of cotija cheese chopped up into big chunks
1 1/2 cups cilantro leaves- rip off the stems
1/2-3/4 cup of roasted/salted pepitas (pumpkin seeds)
8 cloves of roasted garlic
1/4 cup + of Lemon infused Spanish olive oil (4 t. Simply organic lemon flavoring and 1 cup Spanish olive oil blended, can be stored for two weeks)
1 T. Mexican oregeno
1 T. Cumin
1/8 t. Ground chipotle
Couple grinds of pepper.
Put all but the oil in the food processor and give it a spin. While it's running, slowly drizzle in the olive oil. You can make it a paste consistency or add more oil for a more dip like pesto.
I would suggest putting it on tacos. Either a simple veggie taco or with some chicken or carnitas.
Showing posts with label Cooking. Show all posts
Showing posts with label Cooking. Show all posts
Thursday, July 1, 2010

Sunday, April 18, 2010
Pollo Asada Tacos

April's Cooking Light has a chicken asada taco recipe, that I followed but did a little tweaking.
Here's my version of theirs:
Ingredients
- 1/2 cup fresh orange juice (about 1 orange)
- 1/3 cup fresh lemon juice (about 2 lemon)
- 1 teaspoon sugar
- 1 teaspoon cumin seeds
- 1 medium red onion, thinly vertically sliced
- 1 1/2 pounds skinless, boneless chicken thighs, trimmed and cut into thin strips
- 1 teaspoon dried oregano (I like Mexican oregano for this dish)
- 1 Tablespoon ground cumin
- 1 teaspoon of coriander
- 1/4 teaspoon dried chipotle
- 1/4 teaspoon smoked paprika
- 1 teaspoon kosher salt
- 3/4 teaspoon freshly ground black pepper
- Cooking spray
- 8 (6-inch) corn tortillas (ours were bad so we ended up using hard shells)
- 1 cup diced peeled avocado (about 1 avocado)
- 1/2 cup (2 ounces) crumbled queso fresco cheese
1/4 cup olive oil
handful of chopped cilantro (I don't know why they didn't add cilantro in the original recipe-- seems like a crime)
- Preparation
1. Combine first 4 ingredients in a medium bowl, stirring until sugar dissolves. Place onion in a small saucepan; cover with water. Bring to a boil; drain and plunge onion in ice water. Drain onion then add the onion to juice/pickling mixture. Chill until ready to serve. Drain the onions before serving.
Here's my major departure. Dry rub on chicken thighs sounded dreadful to me. So I marinated the thighs in the my own choice of spices (cumin, oregano, chipotle, paprika, coriander, salt, and pepper) and the olive oil for about 2 hours. When ready to cook, go to step 2.
2. Heat a large cast-iron skillet over high heat. Coat pan with cooking spray. Add chicken to pan; cook 4-6 minutes or until browned and done, stirring occasionally.
3. Heat tortillas according to package directions. Divide chicken evenly among tortillas. Drain onion; divide evenly among tortillas. Top each tortilla with 2 tablespoons avocado and 1 tablespoon cheese; fold over. Top with cilantro!
We served them with sour cream and homemade salsa (which was awesome for my first time making a salsa from scratch!). Recipe is below
Salsa
4 tomatillos (cut in half)
8 small, vine ripened tomatoes
1 medium onion cut into thin slices
2 jalapenos (cut lengthwise and with membrane and seeds removed unless you want the extra heat)
1 clove of garlic (cut the top off, add about a tablespoon of olive oil, salt/ pepper, and wrap in foil-- will take the longest to cook)
Coat all ingredients in olive oil (don't need to drown, just a light cover) and place on a cookie sheet. Usually, I use a rimmed cookie sheet, toss about a tablespoon of olive oil on the pan directly, then toss the veggies. Arrange all vegetables (not garlic) on the sheet. Salt and pepper. Throw into the oven for about 30 minutes at 350. Check the veggies at ten minute intervals and stir to evenly roast all the sides.
I pulled the tomatillos and the tomatoes out about half-way or so; they cook faster than the onions and peppers. The garlic always takes longer than everything else, so my plan of action is to crank up the heat to 400 as soon as the rest of the veggies are done. Once the garlic is roasted, squeeze out the golden-brown ooey gooey delight and then throw it along with all the other veggies all into a food processor or blender. I leave the juices out (the tomatoes and tomatillos will likely produce a lot of juice. Add spices (I used 1/2 tsp of cumin, 1 tsp Mexican oregano, and 1/2 tsp of coriander). PULSE-- Do not just let it go willy-nilly. Just pulse less you make hot sauce rather than a salsa. Taste and adjust seasonings as appropriate. Store in the fridge.
Tuesday, February 2, 2010
Tomato tomatto...

When I make this dish with the exact same ingredients, I call it "cheesy surprise." When Saveur makes it, it is called garganelli with peas and prosciutto.
Saturday, January 16, 2010
Organic versus conventional produce

We buy organic stuff, sometimes and now with milk, always. I feel like it's a waste of money at times for certain organic produce. Turns out, there's some truth to that. January's issue of EE's MSL (Evil Empire's Martha Stewart Living) overviews which fruits and veggies are "clean" if conventionally grown and "dirty" suggesting you should go organic. So this list is for my sister, Karel, too, who asked me about this issue very recently.
As usual, buying seasonal and local is best. Better for you, better for the environment.
"The Environmental Working Group found that consumers could cut their pesticide exposure by almost 90 percent by avoiding the most affected fruits and vegetables, and eating the least affected instead."
The Clean 15 (okay to buy conventional)
Onions
Avocados
Frozen sweet corn
Pineapples
Mangoes
Asparagus
Frozen peas
Kiwi
Bananas
Cabbage
Broccoli
Papayas
The Dirty Dozen (buy organic if possible)
Peaches
Apples
Sweet bell peppers
Celery
Nectarines
Strawberries
Cherries
Pears
Grapes (imported)
Spinach
Lettuce
Potatoes

Saturday, January 9, 2010
Rustic Potato Leek Soup
.jpg)
When I hear the word rustic used to describe food, I usually think, chunky, not uniform in size, and all and all a lazy meal. I am choosing to reclaim "rustic" to describe my soup. Here, rustic means, homemade, mashed by hand potato soup, rich with flavor and using basic ingredients.
I drew my inspiration from Pinch My Salt, but tweaked the recipe in terms of fat content and seasoning. She used heavy cream and a lot of it. I didn't have any and I also feel like it would be fine without the extra fat. I also have been listening to Anthony Bourdain's audiobook, Kitchen Confidential, and he says the reason restaurant food tastes better than home cooking, is butter. Virtually all sauces (and soups) are finished with butter added in the end. I didn't add butter at the end, but rather in the beginning and in the middle. I think I used about 3 tablespoons (2 in the beginning and add an extra tablespoon when I added the potatoes). I think that comes out to about a half a tablespoon per serving which is livable.
Ingredients:
1 bag (1.5 lbs) of small yukon potatoes
1 really big leek (white and light green parts diced)
1 container of chicken stock/broth (I used 3/4s of a box of organic broth from Whole Foods)
2 small onions (or one medium) medium dice
1 tablespoon thyme (dried)
1 tablespoon cumin
1 tablespoon kosher salt
1 teaspoon white ground pepper (My new favorite; use regular pepper and it will be fine too, but white pepper is fantastic and if you have the means, I highly recommend picking up some.)
2-3 tablespoons of butter
1-2 tablespoons of olive oil (depending on how much fat you want, you can adjust the oil and butter content)
1/2 cup-1 cup of half and half (Surely, you can use milk instead, it will be less rich, but save on calories. This recipe serves 6-8 as a full meal, so I just think it's really not too terrible per serving)
Directions:
1. Dice the leek, wash it. Wash it a lot. Leeks grow in sand and you would be better off not eating sand. Dice the onion(s). Throw both in a large pot (my favorite choice is ALWAYS a risotto pan) and cook on low in butter for about 3-5 minutes.
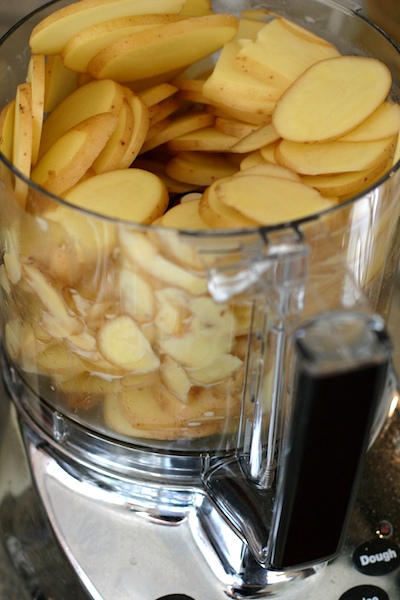
2. Meanwhile, use a food processor to slice the potatoes thin. I saw this on Pinch My Salt. Holy cow is this fast and easy! I added one more tablespoon of butter and the olive oil at this point, all the spices and the potatoes. Cover the potatoes with stock/broth just until the potatoes are covered.
3. Raise the heat! Take the burner up to about medium and bring the potato soup up to a low boil. Slowly pour in the half and half. Cook, stirring occasionally until potatoes are tender. I think about 10-15 minutes, but I don't really pay attention to time; I pay attention to taste. When the potatoes are tender, it's time to turn off the heat.
4. Get out your masher and mash the potatoes to the texture of your choosing. I went "rustic" meaning that they were not pulverized, but rather an even mix. I think the thin slices don't take too much effort to mash. Serve immediately with a nice bread.
The photo below shows the soup pre-mash.
.jpg)
Wednesday, January 6, 2010
Dinner

I made mushroom risotto and roasted Brussels sprouts for dinner. The picture of the sprouts is a bit blurry. Recipe for the sprouts is from Barefoot Contessa. I improvised from the Martha Stewart Cooking School a risotto, which may have been my best yet. The key-- cook the mushrooms separately and add at the very end. Otherwise- mushy blah.

Tuesday, January 5, 2010
Delicious Winter Veggies

So the evil empire that is Martha Stewart did a few recipes on cabbage in this month's edition of her majesty's Living. Her "roasted cabbage" is simple and elegant. So, I bought a lovely head of cabbage and carved that puppy half, then in half again and so forth till I had eight wedges (core intact). Fired up the oven to 450. Placed the wedges on my devine Pampered Chef baking sheet and drizzled some olive oil, kosher salt and pepper on each side. I tried out my new white pepper courtesy of my mad trip to Penzey's Spices yesterday. Pop it in the oven for ten minutes, turn, and roast ten more minutes. Squeeze a little lemon over the top and eat. Healthy, delicious, and a new way (at least new to me) of making cabbage! The picture is from another blog- I of course didn't remember to take a photo.
Wednesday, December 9, 2009
Recipe: Baked Potato Soup
5 yukon gold potatoes
1/2 cup sour cream
2 cups milk (I used whole b/c it was what we had for some baking projects)
4 cups stock (I used chicken, but you can surely use veggie)
3-4 tablespoons olive oil
1 onion(yellow or white)
1/4 lb of bacon cut into small pieces
1 bulb of garlic
1 tablespoon apple cider vinegar
salt
pepper
Baby it's cold outside which to means soup soup soup! This soup requires you to bake the potatoes and then making the actual soup.
Preheat oven to 375.
Quarter potatoes into wedges (skin on is fine), sprinkle with olive oil and salt and set on a cookie sheet. Make sure that you roll the wedges around so they get a little coating of olive oil one each of the cut sides.
Cut the onion into large wedged and separate. Toss in a bowl with a tablespoon of apple cider vinegar and a scant tablespoon of olive oil. Let me tell you, this step makes a huge difference in the flavor of the soup. The cidery bite is subtle, but very well worth the $2.00 for the vinegar. Leave in the bowl while the potatoes and garlic are cooking.
Cut the top off a head of garlic and set the head on a small square of foil. Pour about a teaspoon to a tablespoon of olive oil over top, and salt generously (I used fancy pants Fleur de Sel, but whatever salt you have will work fine). Wrap the foil up and around the garlic so that all the open edges are sealed together at the top. Set on the same cookie sheet as the potato wedges.
Bake at 375 for about 50 minutes until fork tender. HALF way through the cooking, add the onions to the cookie sheet and flip the potatoes over to insure even cooking. You do not want the potatoes to brown, just a light coloring and fork tender.
Once all the veggies are cooked (about 50 minutes total) remove from the oven and check on the status of the garlic. The garlic should be a deep golden color, opaque, and soft. The bulb will be hot to handle so let it set before removing the cloves. The garlic may require a bit more time.
Let the potatoes cool to the point you can touch them. I tend to peel off the skin at this point since it's very easy and wastes little of the potato. If you are a pre-peel type of cook, then by all means, peel them before you bake them. Once the potatoes are peeled, scoop the potatoes and onions into a bowl. Add the entire head of garlic by gently squeezing the bulb. The individual cloves should ooze out without much effort. You can also do this with a spoon by pressing the garlic out of the paper. Either way, add it all. Roasted garlic is sweet and nutty and adds a wonderful depth of flavor for very little cost and effort.
So now, in a large bowl (or in a food processor bowl or blender) you should have all your veggies. I used an immersion blender but you can use whatever tool you have to pulverize the veggies. Don't do it dry, oh no-- at this point, add your sour cream, milk, and about a cup to two cups of the chicken stock. The mixture may be a little pasty-- you don't want that. If it is paste like, add more stock. I ended up using about 4 cups of stock TOTAL, but it's entirely dependent on the viscosity of your mixture. I did not add butter but I did pour a little of the excess olive oil into the mix from the cookie sheet. Up to you about how you would like to control the fat content. Remember, there's bacon in it to, so keep it all in mind. Set the soup base aside while you begin to prepare the next step-- the bacon.
In the pot you will be heating your soup, cook the bits of bacon. Trader Joe's has a new applewood smoked bacon that is OUT OF THIS WORLD on the bacon scale. By all means, if you have access to a TJ's get this bacon. Once the bacon is browned and crispy, remove it from the pot and set it aside. At this point, I tend to use a paper towel or two to soak up the excess fat in the pot. I want the brown bits but not the grease. So I get out as much as I can. Then, before pouring the soup in deglaze the pot.
To deglaze, take about a cup of your stock and pour it into the hot pot. Scrape the brown bits down and let the bacony residue cook off. Slowly pour your soup base into the bacony stock and mix them together. Heat the soup through. If you think it is too thick, then by all means, add more stock. Just make sure to stir it to incorporate the stock to the soup.
Immediately before serving return half of the bacon to the soup (use the other half for garnish on top).
I served the soup with a generous shaving of smoked gouda on top and a few bacony bits of goodness. I also added a good amount of ground pepper as I served it.
This recipe made six very sizable portions.
1/2 cup sour cream
2 cups milk (I used whole b/c it was what we had for some baking projects)
4 cups stock (I used chicken, but you can surely use veggie)
3-4 tablespoons olive oil
1 onion(yellow or white)
1/4 lb of bacon cut into small pieces
1 bulb of garlic
1 tablespoon apple cider vinegar
salt
pepper
Baby it's cold outside which to means soup soup soup! This soup requires you to bake the potatoes and then making the actual soup.
Preheat oven to 375.
Quarter potatoes into wedges (skin on is fine), sprinkle with olive oil and salt and set on a cookie sheet. Make sure that you roll the wedges around so they get a little coating of olive oil one each of the cut sides.
Cut the onion into large wedged and separate. Toss in a bowl with a tablespoon of apple cider vinegar and a scant tablespoon of olive oil. Let me tell you, this step makes a huge difference in the flavor of the soup. The cidery bite is subtle, but very well worth the $2.00 for the vinegar. Leave in the bowl while the potatoes and garlic are cooking.
Cut the top off a head of garlic and set the head on a small square of foil. Pour about a teaspoon to a tablespoon of olive oil over top, and salt generously (I used fancy pants Fleur de Sel, but whatever salt you have will work fine). Wrap the foil up and around the garlic so that all the open edges are sealed together at the top. Set on the same cookie sheet as the potato wedges.
Bake at 375 for about 50 minutes until fork tender. HALF way through the cooking, add the onions to the cookie sheet and flip the potatoes over to insure even cooking. You do not want the potatoes to brown, just a light coloring and fork tender.
Once all the veggies are cooked (about 50 minutes total) remove from the oven and check on the status of the garlic. The garlic should be a deep golden color, opaque, and soft. The bulb will be hot to handle so let it set before removing the cloves. The garlic may require a bit more time.
Let the potatoes cool to the point you can touch them. I tend to peel off the skin at this point since it's very easy and wastes little of the potato. If you are a pre-peel type of cook, then by all means, peel them before you bake them. Once the potatoes are peeled, scoop the potatoes and onions into a bowl. Add the entire head of garlic by gently squeezing the bulb. The individual cloves should ooze out without much effort. You can also do this with a spoon by pressing the garlic out of the paper. Either way, add it all. Roasted garlic is sweet and nutty and adds a wonderful depth of flavor for very little cost and effort.
So now, in a large bowl (or in a food processor bowl or blender) you should have all your veggies. I used an immersion blender but you can use whatever tool you have to pulverize the veggies. Don't do it dry, oh no-- at this point, add your sour cream, milk, and about a cup to two cups of the chicken stock. The mixture may be a little pasty-- you don't want that. If it is paste like, add more stock. I ended up using about 4 cups of stock TOTAL, but it's entirely dependent on the viscosity of your mixture. I did not add butter but I did pour a little of the excess olive oil into the mix from the cookie sheet. Up to you about how you would like to control the fat content. Remember, there's bacon in it to, so keep it all in mind. Set the soup base aside while you begin to prepare the next step-- the bacon.
In the pot you will be heating your soup, cook the bits of bacon. Trader Joe's has a new applewood smoked bacon that is OUT OF THIS WORLD on the bacon scale. By all means, if you have access to a TJ's get this bacon. Once the bacon is browned and crispy, remove it from the pot and set it aside. At this point, I tend to use a paper towel or two to soak up the excess fat in the pot. I want the brown bits but not the grease. So I get out as much as I can. Then, before pouring the soup in deglaze the pot.
To deglaze, take about a cup of your stock and pour it into the hot pot. Scrape the brown bits down and let the bacony residue cook off. Slowly pour your soup base into the bacony stock and mix them together. Heat the soup through. If you think it is too thick, then by all means, add more stock. Just make sure to stir it to incorporate the stock to the soup.
Immediately before serving return half of the bacon to the soup (use the other half for garnish on top).
I served the soup with a generous shaving of smoked gouda on top and a few bacony bits of goodness. I also added a good amount of ground pepper as I served it.
This recipe made six very sizable portions.
Monday, June 15, 2009
Seriously delicious zucchini dish
So I get Martha Stewart Living each month (so what!?). This month she had a French chef make a casual meal that included "zucchini rounds with roasted tomatoes" serves 8. I read the recipe, followed parts, eliminated others, added stuff. Here's my adaptation that was fan-fricking-tastic.
Ingredients:
2 zucchinis sliced in 1/2 inch rounds
9 cloves of garlic
olive oil
3 Tablespoons of pine nuts
3 sprigs of thyme (off my thyme plant)
3 teaspoons of fresh basil (I use Doret brand frozen basil as an alternative to fresh or dried. It is cheap and in the frozen aisle at Trader Joe's)
1/4 cup of water
baking soda
1/3 cup chopped black olives
5 vine ripened tomatoes (about the size of a golf ball)
1 1/2 teaspoons of sugar
1/3 of pkg of Boursin (herb or pepper)
Okay, my presentation was less regal than the French chef's but so be it.
Here's what I did.
Step 1:
Preheat oven to 400.
Chop tomatoes into quarters. Add 2 tablespoons of olive oil, sugar 4 whole (peeled) cloves of garlic. Season with salt and pepper, toss, throw in oven in a small pan for 30 minutes. Note, the next time I will probably run the garlic through the press first.
Step 2:
Meanwhile, stovetop- add 2 tablespoons of olive oil to a large skillet. Add zucchini in one layer. Salt, pepper, add in the 1/4 cup of water and 2 pinches of baking soda. WTF with the soda? Well the Frenchy said that it keeps the zucchini greener. It really did work. Cook the zucchini turning frequently about 15 minutes. Then put those puppies in an awaiting casserole dish sprayed lightly with PAM.
Step 3:
Meanwhile, take 2 more tablespoons of olive oil, the remaining 5 cloves (pressed or smashed) of garlic and all the pine nuts and heat for 3 minutes. Add in the olives. Mix, and set aside until the tomato mixture is done cooking. Once tomato mix is finished with it's 30 minutes in the hot box, add in the pine nut mixture to the tomatoes.
Step 4:
Okay it's assembly time now. Frenchy said to make little mounds of the tomato mixture on top of the single layer of rounds patiently waiting in the casserole dish. Yeah, easier said than done. I did attempt to do this but I think generally if you spread the mixture across the top of the zucchs, you will be fine.
Step 5:
This is all me. As Rosie and I surveyed the wondrous side dish, we said, you know what this needs? The answer (as is often the case in our house): Cheese. My first choice would have been Parmesan but we were out, and by happy accident, we had some left over Boursin. FABULOUS addition! We crumbled tiny pieces of the creamy bliss over the vegetables. I would say we used somewhere between 1/5-1/3 of the package. It wasn't a lot, but it was delicious!!!!
Step 6:
The glorious veggies need one more trip to the hot box. Put it in the oven for 10 minutes and serve. Seriously delicious zucchini dish.
Ingredients:
2 zucchinis sliced in 1/2 inch rounds
9 cloves of garlic
olive oil
3 Tablespoons of pine nuts
3 sprigs of thyme (off my thyme plant)
3 teaspoons of fresh basil (I use Doret brand frozen basil as an alternative to fresh or dried. It is cheap and in the frozen aisle at Trader Joe's)
1/4 cup of water
baking soda
1/3 cup chopped black olives
5 vine ripened tomatoes (about the size of a golf ball)
1 1/2 teaspoons of sugar
1/3 of pkg of Boursin (herb or pepper)
Okay, my presentation was less regal than the French chef's but so be it.
Here's what I did.
Step 1:
Preheat oven to 400.
Chop tomatoes into quarters. Add 2 tablespoons of olive oil, sugar 4 whole (peeled) cloves of garlic. Season with salt and pepper, toss, throw in oven in a small pan for 30 minutes. Note, the next time I will probably run the garlic through the press first.
Step 2:
Meanwhile, stovetop- add 2 tablespoons of olive oil to a large skillet. Add zucchini in one layer. Salt, pepper, add in the 1/4 cup of water and 2 pinches of baking soda. WTF with the soda? Well the Frenchy said that it keeps the zucchini greener. It really did work. Cook the zucchini turning frequently about 15 minutes. Then put those puppies in an awaiting casserole dish sprayed lightly with PAM.
Step 3:
Meanwhile, take 2 more tablespoons of olive oil, the remaining 5 cloves (pressed or smashed) of garlic and all the pine nuts and heat for 3 minutes. Add in the olives. Mix, and set aside until the tomato mixture is done cooking. Once tomato mix is finished with it's 30 minutes in the hot box, add in the pine nut mixture to the tomatoes.
Step 4:
Okay it's assembly time now. Frenchy said to make little mounds of the tomato mixture on top of the single layer of rounds patiently waiting in the casserole dish. Yeah, easier said than done. I did attempt to do this but I think generally if you spread the mixture across the top of the zucchs, you will be fine.
Step 5:
This is all me. As Rosie and I surveyed the wondrous side dish, we said, you know what this needs? The answer (as is often the case in our house): Cheese. My first choice would have been Parmesan but we were out, and by happy accident, we had some left over Boursin. FABULOUS addition! We crumbled tiny pieces of the creamy bliss over the vegetables. I would say we used somewhere between 1/5-1/3 of the package. It wasn't a lot, but it was delicious!!!!
Step 6:
The glorious veggies need one more trip to the hot box. Put it in the oven for 10 minutes and serve. Seriously delicious zucchini dish.
Monday, April 20, 2009
Taco Mix
Don't buy the kind in the store if you keep spices in the house:
1 tablespoon chili powder (I use a mix of chipotle, ancho, New Mexico, and regular)
1/2 teaspoon garlic powder
1/4 teaspoon crushed red pepper flakes
1/4 teaspoon dried oregano
1/2 teaspoon paprika
1 1/2 teaspoons ground cumin
1 teaspoon sea salt
1 teaspoon black pepper
1 teaspoon of sugar
Throw in a baggie or a tupperware and shake. Add into ground meat (or fake meat) with chopped up onions.
1 tablespoon chili powder (I use a mix of chipotle, ancho, New Mexico, and regular)
1/2 teaspoon garlic powder
1/4 teaspoon crushed red pepper flakes
1/4 teaspoon dried oregano
1/2 teaspoon paprika
1 1/2 teaspoons ground cumin
1 teaspoon sea salt
1 teaspoon black pepper
1 teaspoon of sugar
Throw in a baggie or a tupperware and shake. Add into ground meat (or fake meat) with chopped up onions.
Saturday, February 14, 2009
Post Modern Depression Era Brunch: Eggs Benedict for two for $4.07
So I was intimidated to make Eggs Benedict from scratch, but actually it wasn't that hard, not that time consuming, and it was truly delicious.
Here's what you need from the sto. I shop at Trader Joe's and so the prices reflect TJ's expenses.
Butter (1 lb is $2.79)-- you only need 1 stick (70 cents). Can't use margarine, so don't even think about it.
English muffins (6 for $1.99, you need two, so 66 cents)
Eggs ($2.79/dozen, you need 7= $1.63)-- To make Eggs Benedict for 2 people you need 7 eggs. That's right, I said seven.
Canadian Bacon ($2.19 for 10 pieces, you need 4 pieces= 88 cents)
Lemon (35 cents at Russo's)
Tabasco Sauce ($1.99 Chili Pepper Sauce from TJ's= 10 cents)
White vinegar (pantry 10 cents)
There's one step to do the night before, which I scoffed at as a pain in the ass but it's not that bad.
Melt 1 stick of butter in the microwave until its liquid. Pour it into some container like a Tupperware and stick it in the freezer for 2+ hours. Stick a knife in it to get the solid mass out and you will see this gross milky scum on the bottom of the solid butter. Rinse it off with cold water. Hence, you have "clarified butter." Stick the butter back in the freezer till the morning when you are ready to use it. Seriously, it doesn't take that much effort, don't be a bum.
Okay, so it's breakfast time, yeah! I like to have my sous chef (Rosie) help me with things. First, if you don't cook much, get everything out that you need. The Frenchies call this mise en place. I do it because it's a habit, but let me tell you it's vital to do it for Eggs Benedict. The recipe is below which I have adapted from the Food Network (Sara Moulton's). She screwed up on the directions, so I fixed her errata.
Ingredients
2 English muffins split, toasted and buttered (Do this BEFORE you poach the eggs)
4 thick slices ham or Canadian bacon, warmed in the microwave
4 poached eggs
1/2 cup Hollandaise Sauce
Hollandaise Sauce:
3 large egg yolks and 1 1/2 tablespoons cold water
1/2 cup warm clarified butter (Clarify the night before then melt it in the morning in the microwave-- math majors out there, 1/2 cup of butter is one stick)
1 to 3 teaspoons fresh lemon juice (I don't think this is enough lemon juice. Vicki Lee's in Watertown/Belmont makes the most lemony Hollandaise I have ever had. I like about 2 tablespoons minimum lemon juice)
Dash Tabasco sauce (A dash is a tiny amount-- if you're a measuring freak, try 1/4 teaspoon)
Salt and pepper to taste (The original recipe calls for white pepper. I don't have that laying around and can't imagine buying it just for this-- if you don't mind the flecks of pepper, just deal)
Directions
Set up a double boiler to make the Hollandaise. All this is-- a saucepan with about 1-2 inches of simmering water with a smaller pan or bowl on top. Start a fire under the water and bring it to a simmer. I have one of those asinine ceramic stoves so I turn it to high to get it toward a boil then drop it to low when I am ready to do the eggs. You do NOT want the water to touch the bottom of the top pan/bowl. You will get scrambled eggs. BLECK!
In the pan/bowl that is going on top, BEFORE you put it over the water, mix 3 egg yolks (save the whites for something else) with 1 1/2 teaspoons of cold tap water. Whisk it until it gets frothy. Less than 1 minute.
Now put the egg mix over the simmering water. The water should barely be simmering. Here's another important step. You never stop whisking when you are making the Hollandaise.
Continue to whisk until the eggs are thickened, 2 to 4 minutes, being careful not to let the eggs get too hot. The mixture will start to thicken and be a pale yellow. Remove the pan or bowl from over the water and keep whisking for about a minute to cool the mixture a bit.
Again, with the whisking, very slowly add the melted butter, then whisk in lemon juice, Tabasco sauce and salt and pepper. If the sauce is too thick, whisk in a few drops of warm water. Serve immediately or keep the sauce warm for up to 30 minutes by placing the bowl/pan back on the double boiler but completely off the heat source. The whole mise en place thing comes in when you are drizzling in all the butter, juice and Tabasco.
Meanwhile, it's egg poaching time. Here's what you do. You need a large saucepan and fill with 2-3 inches of water. Bring this to a near-boil (not a rapid boil, just an in between state from a simmer to a boil). I turned my water on the same time I turned on my water for the Hollandaise. It can be ready and waiting for you to poach your eggs. Once you are about to start poaching your eggs, add 1 tablespoon of white vinegar to the water. I don't know exactly how this work but it keeps the eggs from glomming all together in a big fat mess. Okay, don't just crack the egg over the boiling pot-- that's just trouble. Instead, get out a bowl (or better yet four little bowls-- one for each egg). Crack the eggs separately into the bowl(s) and then add the eggs one at a time to the water. You can do this straight from the bowl. At this point, turn the fire down on the water-- you don't want a boil-- Some people stir the water before they drop the eggs in. I don't. The eggs are going to disperse a little in the water, but don't worry, they really will come out just fine.
Okay so cook the eggs for about 3-4 minutes. They will be runny in the center. Get'em out one at a time of the water with a slotted spoon and set on a plate. Now it's time to assemble: English muffin, butter, Canadian bacon, poached egg, and drizzle/smoother with Hollandaise.
Timing is a big issue for people, so let me go over a few timing things.
1. Turn on both pots of water at the same time, after you have all of your ingredients out and ready. Microwave the butter at this point as well.
2. Toast the muffins and butter them sooner rather than later unless you have a second person to be in charge of that part. If you have a sous chef, then they should be toasted right when you poach the eggs.
3. Warm up the Canadian bacon in the microwave-- don't cook it, just warm it up. This should be done while the eggs are poaching.
4. Make the Hollandaise BEFORE you poach the eggs. The Hollandaise requires your full attention until it is complete. Once it's done, your eggs should be ready to poach. If you have all of your eggs cracked and waiting for you it (back to that whole mise en place thing) it is a super easy move. To keep the Hollandaise warm, set it over the double boiler completely off the stove/heat. I like to set my top pan in crooked so that some of the steam escapes and the Hollandaise doesn't continue to cook. If it gets too thick for you, then add a teaspoon at a time of warm (NOT HOT) water and then guess what you do? Whisk it in.
Here's what you need from the sto. I shop at Trader Joe's and so the prices reflect TJ's expenses.
Butter (1 lb is $2.79)-- you only need 1 stick (70 cents). Can't use margarine, so don't even think about it.
English muffins (6 for $1.99, you need two, so 66 cents)
Eggs ($2.79/dozen, you need 7= $1.63)-- To make Eggs Benedict for 2 people you need 7 eggs. That's right, I said seven.
Canadian Bacon ($2.19 for 10 pieces, you need 4 pieces= 88 cents)
Lemon (35 cents at Russo's)
Tabasco Sauce ($1.99 Chili Pepper Sauce from TJ's= 10 cents)
White vinegar (pantry 10 cents)
There's one step to do the night before, which I scoffed at as a pain in the ass but it's not that bad.
Melt 1 stick of butter in the microwave until its liquid. Pour it into some container like a Tupperware and stick it in the freezer for 2+ hours. Stick a knife in it to get the solid mass out and you will see this gross milky scum on the bottom of the solid butter. Rinse it off with cold water. Hence, you have "clarified butter." Stick the butter back in the freezer till the morning when you are ready to use it. Seriously, it doesn't take that much effort, don't be a bum.
Okay, so it's breakfast time, yeah! I like to have my sous chef (Rosie) help me with things. First, if you don't cook much, get everything out that you need. The Frenchies call this mise en place. I do it because it's a habit, but let me tell you it's vital to do it for Eggs Benedict. The recipe is below which I have adapted from the Food Network (Sara Moulton's). She screwed up on the directions, so I fixed her errata.
Ingredients
2 English muffins split, toasted and buttered (Do this BEFORE you poach the eggs)
4 thick slices ham or Canadian bacon, warmed in the microwave
4 poached eggs
1/2 cup Hollandaise Sauce
Hollandaise Sauce:
3 large egg yolks and 1 1/2 tablespoons cold water
1/2 cup warm clarified butter (Clarify the night before then melt it in the morning in the microwave-- math majors out there, 1/2 cup of butter is one stick)
1 to 3 teaspoons fresh lemon juice (I don't think this is enough lemon juice. Vicki Lee's in Watertown/Belmont makes the most lemony Hollandaise I have ever had. I like about 2 tablespoons minimum lemon juice)
Dash Tabasco sauce (A dash is a tiny amount-- if you're a measuring freak, try 1/4 teaspoon)
Salt and pepper to taste (The original recipe calls for white pepper. I don't have that laying around and can't imagine buying it just for this-- if you don't mind the flecks of pepper, just deal)
Directions
Set up a double boiler to make the Hollandaise. All this is-- a saucepan with about 1-2 inches of simmering water with a smaller pan or bowl on top. Start a fire under the water and bring it to a simmer. I have one of those asinine ceramic stoves so I turn it to high to get it toward a boil then drop it to low when I am ready to do the eggs. You do NOT want the water to touch the bottom of the top pan/bowl. You will get scrambled eggs. BLECK!
In the pan/bowl that is going on top, BEFORE you put it over the water, mix 3 egg yolks (save the whites for something else) with 1 1/2 teaspoons of cold tap water. Whisk it until it gets frothy. Less than 1 minute.
Now put the egg mix over the simmering water. The water should barely be simmering. Here's another important step. You never stop whisking when you are making the Hollandaise.
Continue to whisk until the eggs are thickened, 2 to 4 minutes, being careful not to let the eggs get too hot. The mixture will start to thicken and be a pale yellow. Remove the pan or bowl from over the water and keep whisking for about a minute to cool the mixture a bit.
Again, with the whisking, very slowly add the melted butter, then whisk in lemon juice, Tabasco sauce and salt and pepper. If the sauce is too thick, whisk in a few drops of warm water. Serve immediately or keep the sauce warm for up to 30 minutes by placing the bowl/pan back on the double boiler but completely off the heat source. The whole mise en place thing comes in when you are drizzling in all the butter, juice and Tabasco.
Meanwhile, it's egg poaching time. Here's what you do. You need a large saucepan and fill with 2-3 inches of water. Bring this to a near-boil (not a rapid boil, just an in between state from a simmer to a boil). I turned my water on the same time I turned on my water for the Hollandaise. It can be ready and waiting for you to poach your eggs. Once you are about to start poaching your eggs, add 1 tablespoon of white vinegar to the water. I don't know exactly how this work but it keeps the eggs from glomming all together in a big fat mess. Okay, don't just crack the egg over the boiling pot-- that's just trouble. Instead, get out a bowl (or better yet four little bowls-- one for each egg). Crack the eggs separately into the bowl(s) and then add the eggs one at a time to the water. You can do this straight from the bowl. At this point, turn the fire down on the water-- you don't want a boil-- Some people stir the water before they drop the eggs in. I don't. The eggs are going to disperse a little in the water, but don't worry, they really will come out just fine.
Okay so cook the eggs for about 3-4 minutes. They will be runny in the center. Get'em out one at a time of the water with a slotted spoon and set on a plate. Now it's time to assemble: English muffin, butter, Canadian bacon, poached egg, and drizzle/smoother with Hollandaise.
Timing is a big issue for people, so let me go over a few timing things.
1. Turn on both pots of water at the same time, after you have all of your ingredients out and ready. Microwave the butter at this point as well.
2. Toast the muffins and butter them sooner rather than later unless you have a second person to be in charge of that part. If you have a sous chef, then they should be toasted right when you poach the eggs.
3. Warm up the Canadian bacon in the microwave-- don't cook it, just warm it up. This should be done while the eggs are poaching.
4. Make the Hollandaise BEFORE you poach the eggs. The Hollandaise requires your full attention until it is complete. Once it's done, your eggs should be ready to poach. If you have all of your eggs cracked and waiting for you it (back to that whole mise en place thing) it is a super easy move. To keep the Hollandaise warm, set it over the double boiler completely off the stove/heat. I like to set my top pan in crooked so that some of the steam escapes and the Hollandaise doesn't continue to cook. If it gets too thick for you, then add a teaspoon at a time of warm (NOT HOT) water and then guess what you do? Whisk it in.
Subscribe to:
Posts (Atom)


 Posts
Posts